Three Tips for Looking Good on Zoom

May 21, 2020
by Linda Holt
Friday, May 8th marked week eight of my isolating at home. In one sense the time has flown by. Then, I look at my gray roots and shaggy hair and realize just how long it’s really been. I knew from day one that I didn’t want to look back after the lockdown was over and feel like I wasted all those weeks. Truth be told, I have not been as productive as I could have been. However, I am happy to report I mastered one new technical skill. I finally mastered using the video-conferencing platform Zoom.
The first time I used it I made almost every mistake possible. I sat in a comfortable chair, but as soon as I went “Live” I saw how bad the lighting was. The second mistake was doing the call from my iPad. After 10 minutes of holding my iPad up so the others on the call could see my face, my arms had given out. My iPad ended up in my lap, and the camera was shooting right up my nose. The third mistake was not thinking about my background. A few simple changes, and I improved my appearance from scary to professional. Below are my three tips for looking good on Zoom.
1. Seek out optimal lighting.
The most flattering light for looking good on Zoom is natural light. If at all possible, set up your laptop or computer so that you are facing a window. You don’t want to sit so close to the window that sunlight is hitting your face, but five to eight feet from a window should look great. If you have a spot in your home or office with more than one window – filling the room with natural light – that’s even better. It’s easy to check for the best lighting. Simply take your cell phone camera and turn it around to selfie mode. Walk around and check out different areas of your home and see where you look the best.
In the image below, a window is behind me. This lighting is not flattering because it is brighter outside than inside. The Zoom light sensor is attempting to expose for the brightest spot, which is outside. On this particular day it was raining. Had it been a bright sunny day, my face would have been be even darker. Okay, I guess I could have smiled, but ignore that and just look at how dark my face is.
 Bad portrait lighting
Look what a difference it makes by simply turning around and FACING the window. Now the natural light from the window is lighting my face, making for a much better Zoom image.
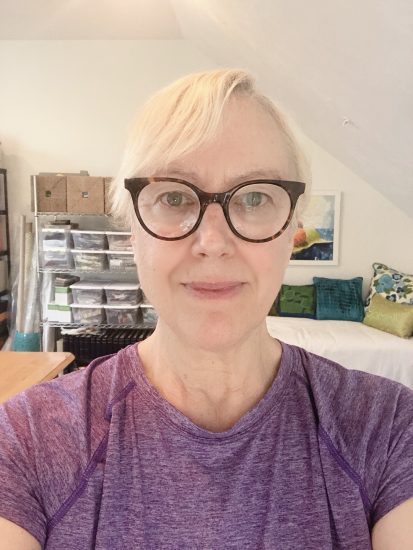 Good portrait lighting
If a window is not possible, then a Ring light is also a good option. If you wear glasses, be sure to position the Ring light high enough so as to not cast glare.
2. Position your camera a little above eye level.
Another common mistake I see people make when doing video conferencing is the camera is positioned too low. The laptop or computer is on the desk, but the participant’s head is a foot or two above the camera. The same portrait photography principle applies to Zoom as it does to still photography. It is more flattering if the camera is positioned a little above eye level and angled slightly downward. You never want the camera to be in the “shooting up the nose” position. To solve this angle problem, simply raise up your laptop or computer, which will raise the camera. Anything sturdy will work, like a few thick books or even a shoe box.
3. Set up a virtual background.
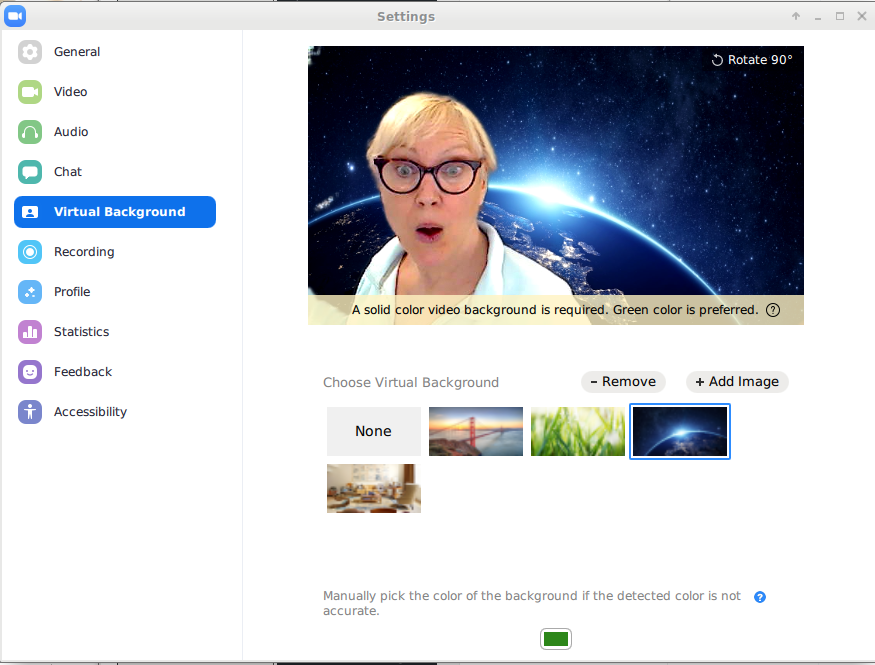
So many people have been broadcasting and Zooming from home, and it’s been fascinating to get a look into other’s homes and office. I have been surprised by some of the cluttered and unattractive backgrounds I’ve seen. Even some of the high-profile newscasters and TV personalities have distracting backgrounds. I am no exception to this. My studio does not work for me as a Zoom background. In fact, it appears cluttered and distracting. The last thing I want is my client not listening to what I have to say because they are so busy looking at the “stuff” behind me. You only need to look at that second image to see the fabric boxes and other distractions, and that is the organized area of my studio!
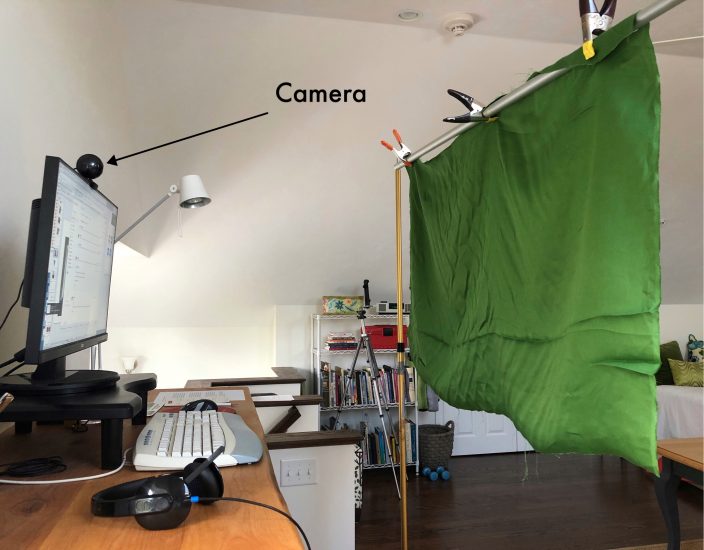 Green screen for virtual background
Obviously, the easiest solution is to tidy up the area behind the camera so that it looks nice. If that’s not possible though, you can upload a virtual background. Zoom has a selection of a few standard ones to choose from, but you are not limited to using one of those. You can upload any image of your choice.
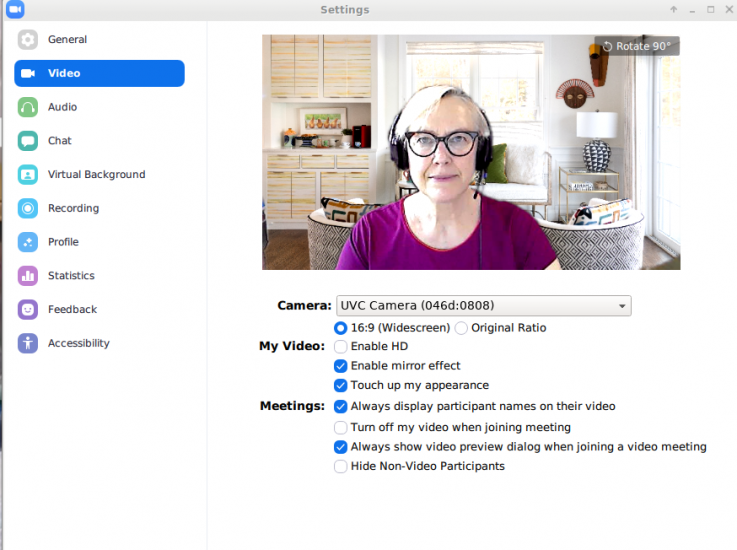
For best results using a virtual background, you are going to need a “green screen.” The photo below shows my actual set up. It’s a remnant piece of green fabric clamped to a photography background stand. You do not need a fancy set up like mine. You can tape green fabric to the wall behind your desk or even use a large piece of green foam core. Side note: Notice my camera is positioned above my monitor so it is pointing slightly downward for more flattering results.
Two easy steps to set up a virtual background in Zoom.
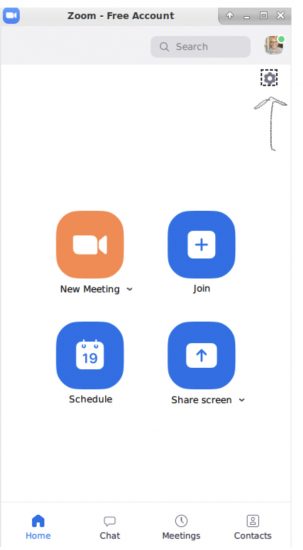
1. Once you have your green screen in place, open Zoom. In the top-right corner, you will see a small gear symbol just under your profile photo.
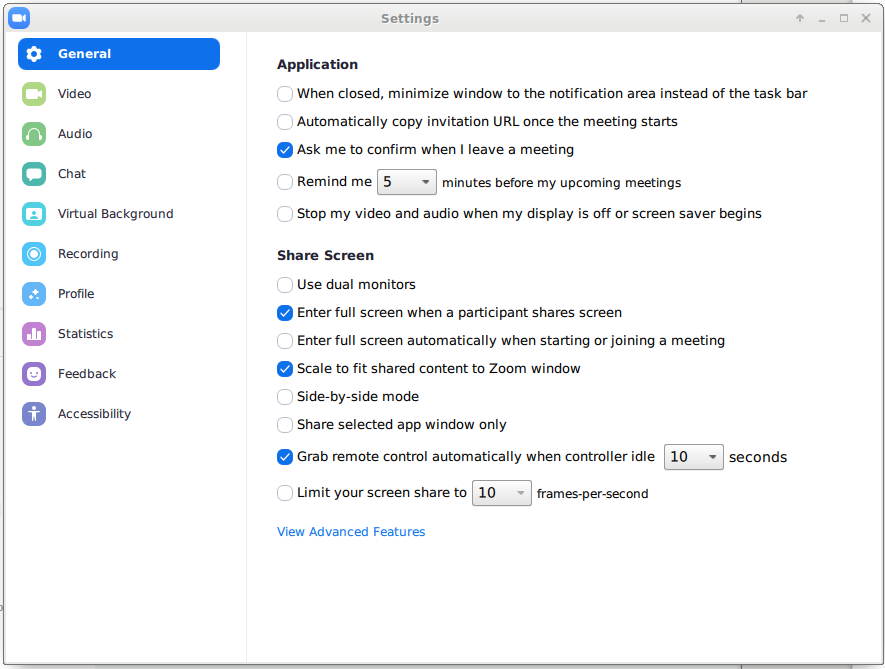
Click on that gear icon, and a second window will open as shown below. On the left side of the window, you will see various options. The fifth one down says Virtual Background.
2. Click on the Virtual Background link, and a few Zoom background options will appear. They are all fairly silly, but for your enjoyment I uploaded the outer space one. There is also tall grass and the Golden Gate Bridge. For professional use, I wouldn’t necessarily recommend using any of these backgrounds. However, any image can be uploaded. If you Google, “Zoom virtual backgrounds,” there are hundreds of choices. To upload your own image or one off the web, just click on the +Add Image icon above the outer space background.
I uploaded several of my own photos for my Zoom backgrounds. Here is the one I used when I did my recent webinar for Aspire Magazine.
ONE LAST TIP
Make sure you turn on the “TOUCH UP MY APPEARANCE” option in Zoom. This feature is a filter that softens your face, making you look good even without makeup. To turn on this filter, click on the VIDEO button. Look under your image and turn on the option “Touch up my appearance.” It’s now on for each call.
It seems that everyone I’ve spoken to, who has the luxury of being able to work from home, has been spending a lot of time on video conferencing. I have been Zooming with clients, and it’s worked out so much better than I could have guessed. I think it just might be my new normal. If my clients’ first impression is from seeing me on a Zoom call, then the least I can do is put my best foot forward and show up looking like the final image and not like the first image!
More News
April 26, 2024 | Business, Trends & Inspirations
Personalization Is Defining Today’s Luxury Projects
April 26, 2024 | Business
PIRCH Permanently Shuts Down, Files for Bankruptcy
April 25, 2024 | Awards & Events
2024 Coverings Installation & Design Award Winners Announced
April 24, 2024 | People
Oatey Announces New COO and CCO
April 23, 2024 | Trends & Inspirations
Sustainability Report: More Education Needed for Green K&B Design
April 2, 2024 | Sponsored
Whirlpool Corp. Brings Purposeful Innovation Home